Pages

Showing posts with label guia. Show all posts

Monday, October 14, 2013

Guild Wars 2 - Converting your currencies to Gold


Questions like "How can I convert my Karma to gold?" or "What can I do with my Badges of Honor" pop up pretty often is this subreddit, so I thought I'd write a guide that explains different methods to get money out of your alternative currencies. I will try to avoid telling too many numbers, because most of them heavily rely on markets that are fluctuating.

Karma: The fastest method to convert your Karma to Gold is to buy Orrian Jewelery Boxes from Karma merchants in Orr. Note that this method took a hefty hit in profits when Karma consumables were nerfed and the prices of lodestones fell. It is a pretty poor conversion rate, and you rely on the relatively rare lodestone drops from the boxes.

Normally the most profitable way is selling various level 400 foods that require some ingredient that is bought by Karma. This however is often much slower, and feels more like flipping on the trading post, than really making money out of your stuff

Gems: Well this one is pretty obvious, there is a window that allows you to directly exchange Gems to Gold and vice versa. Note however that you will lose money if you change your gold to gems and directly change it back. If you really want other methods you might try buying stuff like Mini Packs, or Dye Packs and hope for luck.

Laurels: Right now the most profitable way to get money out of Laurels is buying Heavy Crafting Bags and selling those Mats on the TP. Depending on the Market you might also want to get Unidentified Dyes and sell those (its not worth it to identify them most of the time)

Glory: I would not recommend trying to get money out of glory. There is only 1 way to get money out of it, and the conversion factor is ridiculously poor. If you really need the money you can sometimes get Unidentified Dye out of the chests you get from the glory vendors. I don't know if gold chests drop them more often than copper chests, maybe someone put a little research into that one. Salvage the other Items you get out of those chests for PvP Mats. You can craft additional dyes in the mystic forge with 1 Arcane Orb, 10 Arcane Powder, 1 Arcane Sliver and 1 Consumable Token (you can get those for 200 glory). The dye is then account bound, so you must identify it, and sell the identified dyes. Right now this is the ONLY conversion method that I am aware of.

Badges of Honor: You can trade those for blueprints that you can directly sell for some money. Just look in the trading post and check what would be the best conversion rate. It's usually rams or arrow carts. It's never Ballistas.

Fractal Relics: 35 Relics can get you a skillpoint. Go to the skillpoint section to see how to get money out of those.

Guild Commendations: Right now the best way would be to get a Sentinel Inscription for 10 Commendations and sell them. Normally you also get a nice profit out of guild blueprints, but right now they are pretty low because of the duping exploit.

Dungeon Tokens There are basically 3 ways to get money out of Dungeon Tokens.


  • Get some of the 1 Token slaying potions and sell them. Is pretty usefull for Arah Tokens, since people get those potions for Tequatl
  • If the rare armor you get, is level 70 or higher (Citadel of Flame and higher dungeons) you can salvage those for ectos.
  • You can salvage exotics that have a not craftable stat combination and hope for Inscriptions, which sell for a few Gold.

If you happen to own one of the rare recipes fow jewelery the bosses can drop, you might also be able to get some money out of them this way.

For the unique dungeons:

Ascalonian Catacombs: Rare gear is level 35, but you can get exotic Soldier and Magi weapons and salvage them for Inscriptions.

Caudecus Manor: Rare gear is level 45, but you can get exotic Shaman and Rabid weapons and salvage them for Inscriptions.

Twilight Arbor: Rare gear is level 55, but you can get exotic Magi and Rabid weapons and salvage them for Inscriptions.

Sorrow's Embrace: Rare gear is level 65, but you can get exotic Soldier weapons and salvage them for Inscriptions.

Citadel of Flame: Rare gear is level 75, so you can salvage it for Ectoplasm. All exotic weapon stats are craftable.

Honor of the Waves: Rare gear is salvageable for Ectoplasm. All exotic weapon stats are not craftable, so you can salvage those for inscriptions.

Crucible of Eternity: Rare gear is salvageable for Ectoplasm. You can get exotic Dire weapons and salvage them for Inscriptions.

The Ruined City Of Arah: Rare gear is salvageable for Ectoplasm. You can get exotic Rabid weapons and salvage them for Inscriptions. Selling the Undead Slaying Potions is very profitable.

Skillpoints: One of the best currencies to get gold out of. There are many ways to make a profit, most of them are promoting materials or crafting expensive weapon skins. I know of 2 sites that calculate your profit margins: The first and the second

Influence: Many people don't know this, but you can get Guild Catapults for 500 Influence and sell them for normally a bit under 1 gold. They take 24h to build, so if you need the money fast, you can speed it up by spending up to an additional 5000 Influence to get them instantly. Note however, that you can only take one of them out every 10 minutes.

Guild Merits: There is no real way to get money out of those. Maybe someone will pay you for a hero banner, I don't know. EDIT: OK now 3 people told me I could get Sentinel Inscriptions for them. Guild Merits are NOT Guild Commodations. You get Merits for your guild, while you get Commodations for yourself.

By: Eirh

Tuesday, July 23, 2013

Guild Wars 2 - Cutthroat Politics Campaign Guide

Spoiler-Free Guide

  • When you log in to Guild Wars 2, you’ll receive a mail from both Captain Evon Gnashblade and Captain Ellen Kiel detailing the current situation. Each Captain is trying to accrue influence with the Zephyr Sanctum and will offer you a Support Token to get started on helping their cause. Click the “Show Me” button at the bottom of the mail to find out where to take your Support Token.
  • Go to the Zephyr Sanctum in the Labyrinthine Cliffs and enter the story instance “Audience with the Master” to view a scene between Evon Gnashblade, Ellen Kiel and the Sanctum’s leader, the Master of Peace. Here, you will learn more about the fight for the trade agreement  and your role in deciding the winner!
  • To get to the Labyrinthine Cliffs, head to Lion’s Arch and look for the Labyrinthine Cliffs Transport Facilitator in Sanctum Harbor. He is marked on the map with a gold star sailboat icon and is in the same spot that was used to ship players over to Southsun Cove before the asura portal was finished.
cp-guide-01

How Can I Support My Candidate?

Showing Support
  • Support baskets for Gnashblade and Kiel have been set up near the Zephyrites’ water supply on the Zephyr Sanctum in the Labyrinthine Cliffs.
  • Each time you cast a Support Token,you will be awarded with a Representation Button. Use this button to show support for your candidate while playing content to advance certain achievements.
A few tips:
  • Support Tokens can be acquired from slain mobs; in dungeons; by participing in Candidate Trials, Southsun Survival and Aspect Arena; and in World vs. World. They can also be purchased from the vendor Shady Quill.
  • The Zephyrites will stop accepting Support Tokens on August 5 at 11AM PST in order to start counting them up. Be sure to turn in your Tokens before then!

Candidate Trials

  • Enter into the Candidate Trials, a repeatable instance for solo or group play, to test your mettle and support your candidate! The Lionguard has brought down an Aetherblade airship, and it’s up to you to secure the crash site so that your candidate can capitalize on the situation. There are four levels of difficulty – see how long you can hold out!
  • You can choose which Candidate to support by entering the Candidate Trials marked with Gnashblade’s or Kiel’s image. Each entrance will be in the Labyrinthine Cliffs, near the Captain they are tied to.
  • This event can be challenging, particularly at higher tiers.  If you begin to struggle, consider tweaking your play style and gear to adjust to the situation.
A few tips:
  • Various weapons have been provided to help players defend the treasure piles in the crash site.
  • Keep an eye out for Aetherblades who are only focused on the gold.
  • Dutiful protection of the treasure may be rewarded with Aetherized Weapons taken from the pirates! Keep in mind that the higher your tier, the better your chances for Aetherized rewards!
  • When attempting Tier IV, consider bringing a highly skilled, coordinated party that works well together in order to deal with all the pirates throw at you!
  • In order to complete Gnashbalde: Direct Support, you must complete both Tier I and II in Gnashblade’s Candidate Trials. To complete Kiel: Direct Support, you must complete both Tier I and II in Kiel’s Candidate Trials.
cp-guide-02

Aspect Arena

  • This new PvP team match is being hosted by Captain Ellen Kiel and can be entered by talking with her in the Labyrinthine Cliffs. You will be able to choose between the Sun, Wind, and Lightning Zephyrite fighting styles . Collect as many crystals for your team as you can within the time limit to secure victory.
A few tips:
  • Once in the Labyrinthine Cliffs, Captain Ellen Kiel will be marked on the map with an activity flag marker.
  • In the Arena, look for the aspect icons as hints on where to use a certain Aspect’s fifth skill for movement. Portals with a Sun emblem on the floor might be a prime location for a Light Dash…
  • Frequenters of the Arena have the opportunity to find a Zephyr Rucksack in their rewards!

Southsun Survival

  • This new PvP survival free-for-all activity is being run by the charismatic Evon Gnashblade and can be joined by talking to Captain Gnashblade in the Labyrinthine Cliffs. Up to 20 players will be dropped into Southsun Cove with only a bow with which to survive. Scavenge for supplies and kill other Survivors to become the last one standing and secure your victory.
A few tips:
  • Hunger is a constant threat in the wilderness of the cove; search for rations to keep up your strength.
  • After an initial grace period, Survivors who die will shift over to the mists. Mist walkers should look for blue motes to help them exact revenge on other Survivors. Note that only one Mist Walker can collect a mote, so later in the game those Revenge Motes will be hotly contested!
  • The creatures of Southsun Cove slowly move in from the beaches, be sure to check the status of a camp before you enter or you may find a deadly serving of karka.
  • Dedicated Survivalists have a chance to find a Desert Rose back item in their spoils.
Southsun Survival After Elimination: A breakdown of Mist Walkers and Revenge Motes
  • Imagine you’ve just stopped to scavenge for goods and a fellow Survivor hits you with a long distance Head Shot. The initial two minute grace period is over and now you’re out of the running for final Survivor. What do you do? Fear not –  you may be down, but you are far from out!
  • Eliminated players return to play as Mist Walkers! Mist Walkers are wisps of spirits returned to haunt the remaining Survivors.
  • Mist walker skills run off of Revenge Motes – ethereal blue motes that randomly appear in the wilderness and can be created by:
    • Survivors scavenging passiflora and miscellaneous goods
    • Survivors successfully attacking or trapping other Survivors
  • Stalk surviving players to collect the Revenge Motes they create as they scavenge for supplies and fight other survivors. The motes will allow you to use various skills against Survivors to hasten their demise.
cp-guide-03

Things to do in the open world

Supporting a Candidate for Achievements
  • Many of the achievements require you to support your candidate while performing things like events and dailies in the open world.
A few tips:
  • Be sure to cast your Support Tokens in the Support baskets in Zephyr Sanctum to earn Representation Buttons. These will allow you to show your support while participating in open world content!

Persisting Bazaar of the Four Winds Content

  • Labyrinthine Cliffs
    • The Bazaar of the Four Winds is still taking place in the beautiful Labyrinthine Cliffs
  • Lessons from the Sky
    • The Zephyrite Sky Crystals are still around, so adventurers can  hunt for any crystals they have not found.
  • Sanctum Sprint
    • The races continue!  Enjoy the magical Zephyrite movements  in this high speed competition.
  • Belcher’s Bluff
    • Make sure you don’t miss your chance to face Poyaqui, the Grandmaster of Om, before he moves to Lion’s Arch!
  • Trade opportunities
    • The Zephyrites are still accepting land based supplies in return for their Zephyr Supply boxes. The Zephyrite kid is hoping to load up on Tyrian sweets before the Sanctum departs!
  • Kite Baskets
    • These baskets, filled with Zephyrite goods, are still landing across Tyria for explorers to find!
  • Stolen Kite Baskets
    • Those hoarding skritt are still guarding their pilfered baskets closely; can you find them in some of Tyria’s most challenging jumping puzzles.

Wednesday, June 5, 2013

Guide to Karka Queen and Contractually Obligated


Karka Queen
  • Hold all four settlements (Point Pride, Kiel’s Outpost, Steampipe Steading, and Camp Karka) to get her to spawn left of Steampipe Steading. She has a cooldown so won't always spawn when all four settlements are controlled.
  • You have 10 minutes to kill her. If you fail to do so she will respawn with full health at one of the four settlements.
  • When fighting her, throw karka eggs at her to break down her defenses.
  • Defeating her give you a daily bonus chest with two rares and a chest on the ground that give you some karka shells and 2 random items.
  • Defeating her should give you the Crazed Karka Queen achievement but this is sometime bugged.
  • Her respawn timer appears to be one hour.
Merchant
  • This merchant is called Southsun Economist and normally sells white stuff unless all four settlements are held. You can find him in Steampipe Steading, Pearl islet and probably some other settlements as well.
  • Weapons have basic starter skin and costs 2 gold and 70 karka shells for exotic, 20 silver and 5 karka shells for rare. They have random major sigils.
  • Armor have old skins (Conjurer skins for light, Banded for heavy, and Rogue/Pirate for medium) for exotic/rares and sells for the same price as the weapons
  • Weapons and armor cannot be put in mystic forge or salvaged.
  • Also sell two potions for 5 karka shells and 1 passion flower. One is Karka slaying and the other give +150 toughness
Contractually Obligated
  • Talk to Inspector Ellen Kiel in Pearl Islet and she will have an option to enter a story instance.
  • Make sure you don't exit the instance until you get the achievement - you will need a bit after finishing the final cutscene.

Tuesday, January 29, 2013

How to get Daily Dodge easily


  • Go to Southsun Cove and walk close to a Young Karka. When they are about to use their ranged attacks that shoots about 5 spikes, dodge towards the spikes right before the first hits you. You should get about 3-5 evades, each counting towards the achievement. Kill the Karka and repeat with another.
  • Flame Legion Igniter mobs outside Citadel of Flame in Fireheart Rise (you can find some on the bridge) – if you dodge their flamethrower attack, it counts for something like 6-7 dodges. Run around in a circle around them a few laps and you should get your daily dodger done fast.
  • Ice wurms in Frostgorge sound south of Honor of the Waves dungeon entrance – they have a rock attack that can be dodged very easily. Dodge as soon as you see the rock is in the air if you stand close to them.

Thursday, January 24, 2013

Player’s Introductory Guide to Guild Wars 2


Welcome to Guild Wars 2! Whether you’re new to the MMO genre or a veteran of other games, GW2 isn’t quite the same as anything you’ve tried before. To that end, there are plenty of things all new players need to know to start off right. While the in-game tutorial will teach you the most basic mechanics of the game, there is still much that need more explanation. Now, this guide isn’t going to tell you how to create the most overpowered character, or to be a PvP master, since those are apt to shift every patch. What we will cover is the basics of starting the game and its different modes, as well as a few helpful tips that will allow new players to start off in the best possible position.

Servers

The first thing any player must do upon logging into Guild Wars 2 is to select which Server to play on. Also called Worlds or Shards, Servers determine your team in WvW and the people you most often see in the world. If you have friends who also play, you will probably want to ask them which Server they are on so you can join them easily. But if you find yourself on a different Server from your friends, don’t fret! In GW2 you can still talk to, party, and play with friends from other Servers, you just won’t be able to go into WvW with them.
Once you’ve decided on a Server, time to create your character.

Races

First, you must decide what race to play as. There are five races to choose from in Guild Wars 2. Each race has their own appearance, story lines, and racial abilities. However, unlike other MMO’s all races can be all professions and racial abilities are fairly weak and not usable in PvP. There are no opposing factions to worry about, and all players are friendly when outside of PvP and WvW, no need to choose a race based on that. So don’t worry about trying to squeeze out a slight advantage or choosing the right faction, just play what you like!

 Human - Diverse and robust, the Humans of Tyria have endured much through the ages. Now unified under the nation of Kryta, Humans are led by their Queen and pray to their six gods for favors.

  Norn – Great northern warriors, the Norn look much like stout, oversized Humans but are a faction onto their own. They have a hunting-centric culture and the ability to shapeshift into various were-animals.

 Charr- An imposing race with feline features, the Charr are fierce combatants. Their culture is extremely militaristic, relying on strict discipline and ingenuity to secure their place in Tyria.

 Asura - An entire race of mad scientist midgets, the diminutive Asura have towering egos and a rodent-like appearance. Obsessed with advancing all forms of science and magic, they never miss a chance to remind everyone of their superiority.

 Sylvari - Plants imitating Humans, the Sylvari have an elvish nature and leaves, bark, and stems for flesh. Their earnest and curious nature is owed to their recent introduction to the world of Tyria, and they believe it is their duty to protect it from the Elder Dragons.

Professions

Next, you must choose your character’s profession. Each of the eight professions or classes in Guild Wars 2 possess their own, unique methods of attack, as well as the ability to heal themselves and provide aid to allies. Unlike other MMO’s there are no dedicated tanks or healers here, so don’t worry about what role will get you in groups and instead choose based on which profession will fit your play style best.

 Warrior - A versatile weapon master, the Warrior wields blades, guns and blunt instruments with unmatched proficiency, using them to tear through battle in a fury and build their adrenaline levels to unleash terrifying blows. Exemplifies the Knight or Berserker archetype.

 Guardian - With heavy armor and fanatical conviction, the Guardian uses massive Hammers and Greatswords to smash enemies, unbreakable Shields to defend themselves, and holy magic and virtues to help allies or trap foes. Exemplifies the Paladin or Magic Knight archetype.

 Thief - Specializing in stealth and poisons, Thieves rely on traps and tricks to escape from bad situations, aid allies, or get in position to steal from and assassinate their opponents with devastating attacks using Daggers, Swords, or even Pistols. Exemplifies the Assassin or Rogue archetype .

 Engineer - Possessing the most ingenious machines and potions throughout Tyria, Engineers use their cunning to modify their Pistols and Rifles with new tricks, wield a number of gadgets and explosives, and empower themselves with potent Alchemical concoctions. Exemplifies the Mechanic or Alchemist archetype.

 Ranger - With the ability to command nature’s most fearsome beasts, the Ranger also uses Long Bows to attack from afar, Greatswords to face a charging enemy and nature magic to fortify themselves, their pets, and allies. Exemplifies the Hunter or Archer archetype.

 Elementalist - Able to harness the immeasurable powers of the elements, Elementalists use Staves and Daggers enchanted with Fire to devastate their enemies, Air to zip around the battlefield, Earth to protect themselves and Water to restore their allies. Exemplifies the Mage or Wizard archetype.

 Mesmer - Bending the fabric of reality itself, Mesmers manipulate minds and bodies with Staves, Swords and Greatswords to help or harm others, open portals for allies and create illusionary clones to distract enemies before shattering them for powerful effects. Exemplifies the Illusion Mage or Magician archetype.

 Necromancer - Controlling the forces of life and death, Necromancers channel their power through Staves, Daggers, or Foci to summon horrific creatures of rotting flesh, curse their enemies, or even drain life away before using it to fuel their most fearsome spells. Exemplifies the Death Mage or Lich archetype.

Starting Tips

Once your character is created, you’re ready to go off into the world. Now, I can’t detail an entire game tutorial for you here, and any attempt would just pale in comparison to the tutorials the game gives you as you enter the world. So instead I’ll emphasize pay attention to the tutorial and tips, and give some extra tips everyone should know but isn’t always covered in-game.

  • The very first thing you should do in Guild Wars 2, and any PC game, is press Esc, go to Options, and carefully peruse every option and key binding available to you in the game. Adjust the settings to your liking, this will help you to learn the game and help it customize to your play style. 
  • One option that most players recommend disabling is “Double Tap to Evade” under the Combat/Movement header. While some players enjoy it, its generally considered to be a nuisance in combat and jumping puzzles and is better to give Dodge its own unique button.
  • Never be afraid to explore. Its a big beautiful world out there, and there’s no rigid quest hubs to tie you down, so go see it!
  • Starting at level 2, you can always teleport instantly, for free, to Lion’s Arch, the central city in GW2. Click the PvP icon  in the top left area of your screen and in the PvP window that appears click “Go to the Heart of the Mists.” This will take you directly to the Mists, the PvP hub of GW2. From here, you can click the same button again to go back to where you were, or continue past a short tutorial to go to the main hub where a teleportation gate to Lion’s Arch awaits. Lion’s Arch also possesses gates that will take you to any of the other cities in the game. Be sure to abuse this.
  • You can easily clear bag space at any time. To do so, open you Inventory window, click on the gear icon in the top right, and select Deposit All Collectables. This will send all your crafting materials to your bank, which can be access from any crafting table or NPCs in every city.
  • You can sell on the Trading Post anytime, anywhere. Also called the auction house, the Trading Post lets you buy and sell from other players from anywhere. The default shortcut key is ‘O’. Note that you will have to visit a Trading Post NPC to pick up any items or money you earn there.
  • Buy gathering equipment as quickly as possible. Harvesting Sickles, Logging Axes, and Mining Picks are available from most NPC merchants and will allow you to gather valuable crafting material  and Experience from the world around you. Be sure to find a merchant and start gathering as soon as you can.
  • Don’t be afraid of other players. Years of other MMO’s have taught people to avoid one another in the world, not helping others out of fear of ‘kill stealing’ or getting attack by hostile players. In GW2 there is no world PvP or ‘kill stealing’, every player attacking an enemy will get full Experience and their own loot drops. Also anyone can Revive a dead player by approaching them (default ‘F’), and it gives you Experience, so never avoid helping someone out!
  • Don’t squander money. Again, many other MMO’s give you exponentially more gold as you level up. Not true in GW2. While you will make more money as you level, it is not the crazy, exponential amount most new players expect.You can afford to spend money on what you’ll need, but its always a good idea to save up as much as you can, even one gold coin can be quite valuable at max level.
  • Learn to dodge. Observe your enemy’s movement carefully, and learn when and how to dodge their attacks. The quicker you get the hang of this the better off you’ll be. It may not feel very necessary at first, but later in the game it is your only hope of staying alive.
  • Learn Combos. These are skills that combine a ground effect (the “field”) with another skill (the “finisher”) to add special and powerful effects to skills. They’ll become essential to understand in the late game, and if you learn about them early, you can perform a lot of neat tricks. Be sure to check your skill tooltips to see which ones combo!.
  • Every time you use a Trait book (needed at levels 11, 40, and 60), all your character’s Trait’s are reset. You can use this to adjust your build or try out new ones.

PvP

PvP in Guild Wars 2, also called structured PvP or sPvP, consists of two teams of 5-8 players each on various maps that feature ‘Conquest’ style game play. Both teams fight to capture 3 nodes, gaining points for each node held, first team to reach 500 points wins. While all the maps have these 3 points as the main objectives, each have an additional mechanic unique to the map to spice things up.

To start, open the PvP window by clicking the PvP icon  along the top left of your screen, then click the ‘Go to the Heart of the Mists’ button that appears on the PvP window. This takes you to the Heart of the Mists, the PvP lobby in GW2. If it’s your first time, you’ll have to go through or skip a basic tutorial that does a decent job of drilling the basics of PvP into you. Continue on and you’ll find yourself in the lobby proper.

Here, everyone is level 80 (the max level), can access all skills and respec your traits at will. In addition, your gear will be automatically replaced by special PvP gear. This special gear is equal in power for all players, but you can customize the stats and bonuses you receive. Seek out the NPCs to the east and they will supply you with all the gear and upgrade components you could ever want. Be sure to check them out.


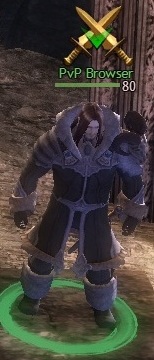
Getting started in PvP is simple, just go talk to the ‘PvP Browser’ NPC in the west side of the lobby and choose a match to head into. If you’re feeling lazy, you can just click the Play Now button in the lower left of the Browser window, but unfortunately that seems to have a tendency to throw players into matches devoid of other players.

There’s far more to PvP than just this, but you will now be able to get in there and begin learning the intricacies of PvP.

WvW

World Vs. World is one of the most unique and interesting features available in Guild Wars 2. It is a massive, 3-way war between three different servers labeled as red, green, and blue teams, represented by hundreds of players each. Each WvW match continues for a week of non-stop action before a winner is declared and servers are matched up again for the next round.

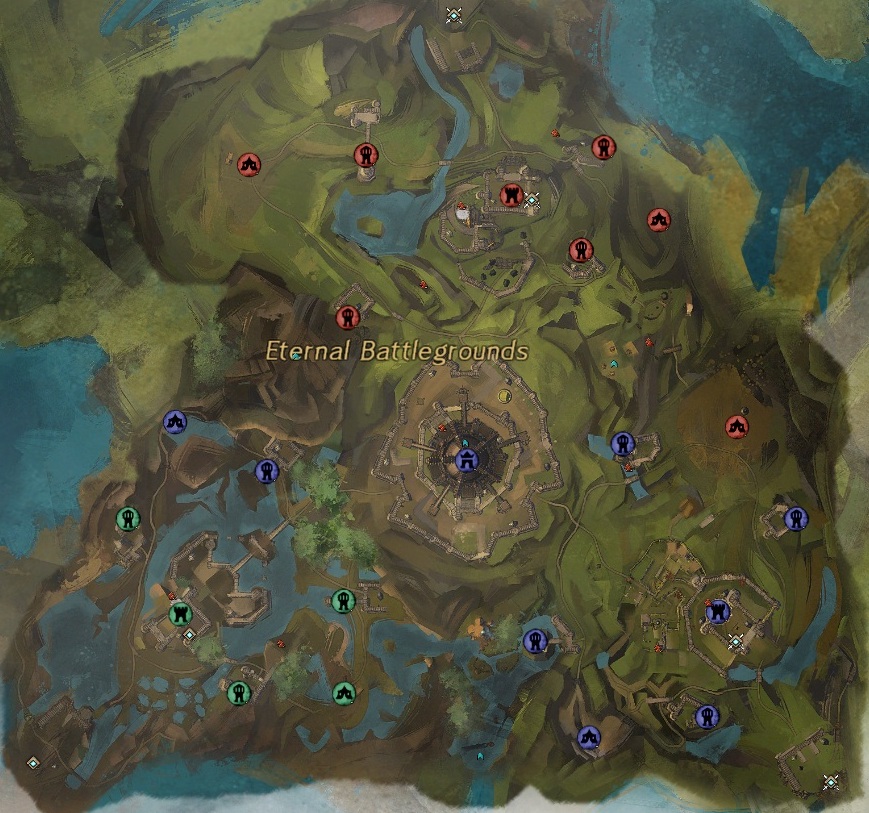
There are a total of four massive battlefields that compose WvW. Three of these maps serve as home base maps, one as a home for each server which generally owns the majority, but not the entirety, of their map. The fourth map, dubbed the Eternal Battlegrounds, serves as the central map for conflict as each server is given an equal slice of the map to occupy.

Here, the goal is for players to gather and coordinate to assault the other teams’ towers, camps, and keeps. Teams earn points every few minutes for every location they are in control of. These points can give bonuses to everyone on the entire server and ultimately determine the winner of the match. Players can pick up a resource known as  Supply in order to build vehicles to lay siege to locations and to upgrade or repair structures that their team owns.

tarting at level 2, any player can enter WvW at nearly any time. All players will be automatically leveled up to level 80, the max level, while in WvW. However, all your skills, traits, and gear will remain the same as they are in PvE. Because of this, higher level players will still have a significant advantage over lower ones, so some players may wish to wait until they reach a higher level before taking on WvW.


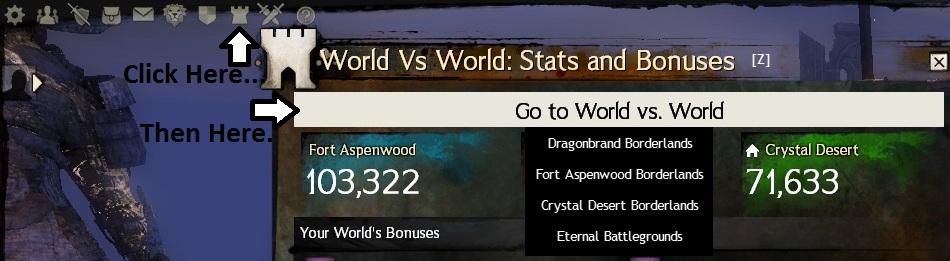
To enter WvW, simply open up the WvW window by clicking the tower icon  in the top left area of your screen, or by pressing the default hotkey of ‘B’. Now, Click on the ‘Go to World vs. World’ button button at the top of the window and select from the drop-down menu which map you would like to enter.


Upon entering a WvW map, its easy to get confused by all the icons crowding your map. However, its actually not very complicated once you understand it. The color of the icon denotes which world currently possesses that location. As for what each one means…

Resource Camp Resource Camp – WvW starts here. These small camps generate the Supply and Supply Caravans that power the rest of the buildings. Resource Camps by themselves have fairly weak defenses and, if undefended by an opposing team, can be captured by a small group of about 2-4 players.

 Supply Caravan – These caravans originate from Resource Camps and travel to the other locations, keeping them supplied with… well, Supply. Without regular deliveries from caravans, Towers and Keeps won’t last long against sieges. This is why it is often a good idea for enemies to target and destroy these caravans. Caravans by themselves are fairly weak and, if undefended by an opposing team, able to be destroyed by 1-3 players.

Tower Tower - Towers have a sturdy defensive wall and a small contingent of NPC defenders. They’re good for serving as bases for small groups of players looking to head out to further into the battlefield. If looking to assault one, its generally a good idea to set up a Ram to bust down the gate. Overall, their defenses are a bit stronger than Resource Camps and, if undefended by an opposing team, should be able to be captured by 4-7 players.

Keep Keep - Large bases with two separate sets of walls and a decent contingent of NPC defenders, Keeps provide an excellent base of operations for large groups of players. Siege vehicles are absolutely necessary when assaulting one of these. Has strong defenses and, if undefended by an opposing team, may be captured by 10-20 players. But don’t expect to capture these without heavy resistance!

Castle Stonemist Castle – The pinnacle of WvW, Stonemist Castle is located only in the center of the Eternal Battlegrounds. It is the largest structure in WvW and serves as a focal point of conflict. All servers want it, but only one can own it. Possessing two very sturdy sets of walls and a sizable contingent of NPC defenders, not to mention a massive defending force from the opposing team, be sure to bring as many players and siege vehicles as possible when assaulting this Castle.

And a few other icons worth recognizing right away…

Current Battle Skirmish -This icon shows up wherever a fight is currently going down. If you’re nearby, you’ll probably want to head over and help out!

Commander Commander – Commanders are players with this special icon over their heads. These icons denote them has generally being leaders of other players, so if you’re looking for something to do, try following one. To join a Commander’s group, click on their icon on the main and select ‘Join Squad.’

Of course, there’s far more to WvW and all of Guild Wars 2 then what is mentioned here. But this should provide you with the basics you need to know to get out there and start playing effectively. Good luck and get going!

Source: http://intothemists.com

Friday, January 18, 2013

Guild Wars 2 - Elementalist Focus Guide


Guild Wars 2 - Elementalist Focus Guide by  Elr3d

Hello guys!
It's been pretty much my thing to play the Focus on my Elementalist lately. As a bit of background, I use my Elementalist mostly in WvWvW (it's the funniest class I have at hand) and found it effective in dungeons, though the amount of snares and control you have can prove unnecessary in some of them. My comments on skills will mainly be from a WvWvW point of view.

Focus a very underplayed weapon, and, in my opinion (somewhat biased I'll admit), most underrated. As such, it's difficult to see new builds using Focus emerge, because well, everyone loves what D/D can offer, and it's common belief that what D/D can't offer, Staff can. And there was quite the amount of videos and great guides to prove it. Now, I'm not denying the inherent qualities of D/D and Staff, or even S/D (which is a popular leveling set), but I'd like to address the fact most Elementalist are thinking the focus is "bad" or not worth building around.

Let's see why the Focus is actually a worthy weapon for Elementalist.
What is the Focus for Elementalist? It's mainly a weapon providing you very useful situational utilities, which while being a lot less mobile or bursty than a Dagger Off hand, allows you to absorb quite the punishment before going down, and dish out some ranged snares a Dagger simply cannot do. I find it also promote careful and thoughtful play as opposed with simply rolling your usual D/D dps rotation and start panicking when you get knocked down in the middle of it.
I'll go through the different attunements and related skills.

  • Fire: Probably the least appealing attunement for the Focus, which may be a reason why the Focus as a whole is underplayed as Fire in Dagger Off-hand is actually very strong.
The #4 is a Firewall, which as a Fire field has its uses in the same way as Ring of Fire do. We'll see later why the small size of the field isn't a problem with a Focus.
The #5 is the Fire Aura, which ticks burning around you (Edit: ticks burning on hit, thanks kibakiri for pointing that out), and is objectively the worst Aura of all whatever your perspective given the Elementalist easy access to burning and the huge cooldown (40 seconds for such a shitty aura is terribad). However, being an Aura, it makes the Focus eligible for Auramencer play.

  • Water: This element is actually good and where the fun begins.
The #4 is a 900 ranged snare inflicting 3 second chill on a 25 second cooldown, which means it's almost impossible to dodge as your character will only move his hand to trigger it.
The #5, Comet, is a 900 range small AoE daze (2 seconds) on a 120 radius around the landing location with a 25 seconds cooldown. This skill isn't that cool at first glance, but it's a blast finisher which triggers at your location with a very low cast time. This is the main use of it, and the low cooldown makes it available very often.

  • Air: Things start getting awesome.
The #4 is the single best defense against projectile in the game. It creates a huge (400 radius) zone of winds lasting 6 seconds, where projectile cannot enter (or be created), as they are "destroyed". Note they are "destroyed", and not "blocked".
This means this works against unblockable projectiles, such as trebuchet and catapult shots, and this skill alone is a reason why all WvWvW Elementalist should carry a Focus in their bag to help defend the walls. 30 seconds cooldown, 24 when traited, which means 4 Elementalist can keep it up constantly when traited, and if well coordinated, 3 of them can nullify trebuchet damage entirely. Swirling winds is also invaluable in zerg battle as it's one of the only AoE spells that don't give a shit about the 5 man limit. You can try and throw a hundred projectile through it, they'll all get destroyed. It allows you to escape almost anything safely if you're out of reach of melee players. It has great uses in PvE, as it can block any projectiles. For instance, CoE turret Golem buffs are actually projectiles thrown by the turret. Cast the winds on the golem and he won't get buffed anymore. CoF AoE fireball turrets get stopped by this skill also.
The #5 is a 900 ranged 2 seconds knockdown (!!) in the same fashion as the Water #4, making it very difficult to dodge, and is an awesome burst initiator.

  • Earth: Earth is the attunement where you'll basically say "I won't die".
The 2 spells are defense-oriented and instant cast, so you can use them even when CCed.
The #4 is a very versatile 25sec cooldown skill that do moderate AoE damage, cure three conditions and give you projectile reflection for 3 seconds. It's great to use inside a burst into superior enemy force, as your Elementalist throwing magic everywhere will get strongly focused, and you'll just throw their attack back in their face. And it's a blast finisher that triggers at your location, as does Comet (Water #5), which makes Firewall->Comet->Magnetic Wave a very fast 6 might combo.
The #5 spell is the second reason an Elementalist will want to use a Focus. Obsidian Flesh is a 4 seconds invulnerability, instant cast, on a 50 seconds cooldown (40 when traited). It allows you very creative gameplay, the most fun use I have of it is to cast it while transforming into a Tornado, as the invulnerability will carry over the first few seconds of the transform. Also awesome escape tool which compensates the glaring lack of mobility.

So yeah, Focus has good stuff, now why should I give up my pretty numbers to run it?
Focus basically give you very reliable defensive tools in Earth and Air attunements. As such, running a Focus doesn't force you to take at least 2 cantrips to just be able to stay alive. This most notably opens the door of Arcane builds and Glyphs builds while still being able to react to an incoming heavy burst, as you can afford to run 0-1 cantrips (remember that attunement swap can be used while CCed, so Obsidian Flesh and Magnetic Wave can very much compensate the lack of stunbreakers).

Here's what I use at the moment as D/F and S/F elementalist. I run an Arcane build, using the flexibility of Elemental Surge to inflict the needed condition at a given time. The gear I use is high power/precision oriented, with some condition damage and some toughness.

Scepter/Focus (Note it's the same traits repartition and I just swap the aura traits for the Toughness when channeling, heal and Air auto attack being channeled)

I won't go into detail with my build, as I plan to do an explanatory video of it, and this post is getting long enough already.
  • Coupled with a dagger, a Focus can allow you to get focused and resist the burst. Considering you have the Shocking Aura on Dagger main, this makes up for the best "Come on, hit me!" setup. Magnetic Wave + Shocking Wave makes you immune to projectiles, while punishing people that wants to melee you, leaving you only vulnerable to AoE spells. Dagger Main offer enough mobility (Fire #3 and Earth #3) for you to be unpredictable, and give you another Water snare. Overall a very powerful melee alternative to D/D, dishing out still decent damage while being able to resist bursts.
  • Coupled with a Scepter, a Focus allows you to secure the most damaging spells you have, Dragon's Tooth + Phoenix. Air #5 knockdown duration is just enough for you to land them both, and pretty much force your enemy to use up a stunbreak to get out of the shit he's into. You can protect everyone in the group with Swirling winds, pop Obsidian Flesh if you get focused, use Comet to shut down ranged immobile characters (some necros don't seem to move much when fighting) for a few seconds. The range of the focus spells is the same as the Scepter so they synergize good.

Conclusion/TL;DR
Try the Focus. It allows you to take a step away from cookie butter play, and will make you play better as you'll have to react on the fly and not only apply your rotation. The tools it offers are incredible, and if you are aware it's a control/snare/projectile defensive weapon you can still build a powerful offensive character by slotting offensive utility skills instead of your usual 2-3 cantrips you use to stay alive.
I hope this post will get some Elementalist to try it out, and we'll be able to see more Focus play and builds in the future!

Thursday, December 13, 2012

Artificer's Guide: 0-400 in 1.4gp


Shopping List & Costs

As part of the list below, you’ll need to purchase 45 Tier 5 Fine Crafting Materials.  You’ll have to select which one of those to buy based on prevailing market conditions (see instructions for more information).  You’ll also need to buy a Mithril Imbued Inscription from the Master Artificer vendor for 672 Karma.
The last three items you’ll make are Level 80 rare weapons.  These will typically sell for about 30 silver on the TP, but if there is an upswell in supply the prices will fall, rapidly.  Instead of selling them on the TP, you can salvage them with a Black Lion Salvage Kit (or a master’s kit if you don’t have one) and get somewhere between 0 and 9 Glob’s of Ectoplasm (with an average of about 2).  The choice is yours.  You can also view current prices using a live updating google spreadsheet created by a MassMediocrity (quick note, the google spreadsheet only lists costs, you can expect about 2.2g of items to sell).
Guide - Artificer - Costs

Instructions

All but Tier 5 is repetitive and very quick.  For T5, specifically for 375-400, you’ll need to craft 3 different rare weapons using an imbued mithril inscription and each inscription requires 15 Tier 5 Fine Crafting Materials.  The costs on Tier 5 Fine Crafting Materials vary with supply and demand so pick the cheapest one.
Tier 5 Fine Crafting Materials and corresponding Inscription:
The following table shows the instructions for each tier:
Guide - Artificer - Instructions

Discoveries

Source: http://www.errantquest.com

Monday, December 10, 2012

Guild Wars 2 Guide: 1-400 Cooking in 1.5g and 1k Karma


Material | Amount Cost | Location
Water | 50 | 4s Crafting Vendor
Flour 150 | 12s Crafting Vendor
Butter 250 | 20s Trading Post
Salt 75 | 6s 40c Crafting Vendor
Peppercorn | 50 | 5s 50c Trading Post
Vegetable Oil | 25 | 80c Crafting Vendor
Vinegar | 25 | 80c Crafting Vendor
Egg | 75 | 24s 75c Trading Post
Sugar | 250 | 20s Crafting Vendor
Baking Powder | 25 | 2s 40c Crafting Vendor
Lemon | 50 | 42 Karma Milton Book, Cornucopian Fields, Gendarran Fields
Pasta with tomato sauce 25 | 1s Trading Post
Meatball | 25 | 4s Trading Post
Chocolate bar | 25 | 15s 75c Trading Post
Cherry | 75 | 450 Karma Disa, Snowslide Ravine, Dredgehaunt Cliffs
Starch | 25 | 2s 40c Crafting Vendor
Blackberry | 75 | 27s 75c Trading Post
Pear | 25 |112 Karma Braxa Scalehunter, Champion's Shield, Iron Marches
Peach | 75 | 450 Karma Nrocroc Chief, Apostate Wastes, Fireheart Rise
Asparagus | 25 | 3s 25c Trading Post
Slab of Red Meat25 | 1s 25cTrading Post

Total 1525c and Karma 1054


Crafting

0-25

Ball Of Dough - Craft 25
- Water
- Flour
- Butter

Salt and Pepper - Craft 25
- Salt
- Peppercorn

25-50

Simple Dressing - Craft 25
- Jar Of Vegetable Oil
- Jar of Vinegar
- Salt and Pepper

50-75

Cookie Dough - Craft 25
- Butter
- Flour
- Egg
- Sugar

75-100

Bakers Dry Ingredients - Craft 25
- Flour
- Baking Powder
- Salt
- Sugar


100-125 

Lemon bar - Craft 25
- Lemon
- Butter
- Egg
- Baker's Dry Ingredients


125-150

Spaghetti and Meatballs - Craft 25
- Plate of Pasta with Tomatoe Sauce
- Meatball

150-175

Chocolate Cherry - Craft 25
- Chocolate Bar
- Cherry

175-200

Cherry Tart - Craft 25
- Butter
- Sugar
- Cherry
- Ball of Dough


200-225

Cherry Pie Filling - Craft 25
- Sugar
- Butter
- Starch
- Cherry


225-250

Blackberry Cookie - Craft 25
- Cookie Dough
- Blackberry

250-275

Blackberry Pear Compote - Craft 25
- Blackberry
- Pear
- Sugar


275-300

Blackberry Pie Filling - Craft 25
- Blackberry
- Sugar
- Flour
- Lemon


300-325

Peach Cookie - Craft 25
- Peach
- Cookie Dough

325-350

Plate of Steak and Asparagus - Craft 25
- Slab of Red Meat
- Salt and pepper
- Asparagus
- Butter


350-375

Peach Tart - Craft 25
- Butter
- Bag of Sugar
- Ball of Dough
- Peach


375-400

Peach Pie Filling
- Flour
- Sugar
- Butter
- Peach

SOURCE: http://dissentient.org

OUTDATED: Always current crafting guides for Guild Wars 2 : http://www.gw2crafts.net/